Creating a LDK Product
When you define a LDK Product, you can specify the following:
- The Features the Product contains
- Their individual license terms
- The content and layout of the memory data stored in Sentinel protection keys
To create a LDK Product:
-
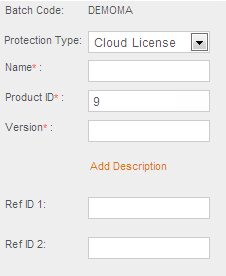
In the Protection Type drop-down list select LDK License.
- In the Name field, enter a name for the product (maximum length 50 characters). The name must be unique in the selected batch.
The naming convention is case-insensitive, for example, the Trial, TRIAL, and trial are considered identical.
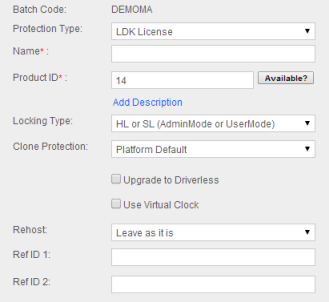
- Sentinel EMS provides a unique sequential Product ID for each new Product in the Product ID field.
You can also assign your own numeric identifier to the Product, for example, to maintain consistency with existing Product data. The Product ID that you specify must be unique in the selected batch.
The Product ID should be between 2 and 65471.
- (Optional) To add a description to the Product, click the Add Description link. The Description field appears. In this field, you can enter text to provide additional information about the Product (maximum length 510 characters).
- In the Locking Type drop-down list, select the protection level for the Product:
- HL—The Product can be supplied with Sentinel HL keys only.
- SL User mode—The Product can be supplied with stand-alone Sentinel SL keys only.
- SL Admin mode—The Product can be supplied with network Sentinel SL keys only.
- HL or SL Admin mode—The Product can be supplied with either Sentinel HL keys or Sentinel SL keys (network).
- HL or SL (Admin mode or User mode)—The Product can be supplied with either Sentinel HL keys or Sentinel SL keys (network or stand-alone).If you prefer not to specify the protection level in advance, you can assign this locking type to a Product. With this locking type, the decision on which type of Sentinel protection key is to be shipped with the Product is made when each Entitlement is processed.
A Product that has been defined with the Sentinel HL or SL locking type is always supplied with the Sentinel SL key-level of protection, even when it is shipped with Sentinel HL keys.
If Sentinel SL locking type is selected, the Clone Protection drop-down list appears so that you can choose a clone protection scheme. By default, this drop-down list is visible on the user interface(Software that is protected by a Sentinel HL key is not vulnerable to machine cloning).
Only Products that contain features will be clone protected.
Specify the clone detection scheme from the following:
Platform Default The platform default clone protection schemes are decided on the basis of the version selected from the Default Clone Protection Version drop-down list available under the Administration Console. Advanced Physical Machine
Following clone protection schemes are available to protect against the cloning of physical machines:
- PMType1: This scheme uses two components to verify fingerprints: hard drive serial number and motherboard ID.
- PMType2: This scheme uses various components such as CPU, ethernet card, optical drive, and PCI card slot peripherals, along with the hard drive serial number and motherboard ID to verify fingerprints. This scheme provides enhanced reliability against false positive clone detection and maintains the inherent security of the scheme.
- PMType3: This scheme is specifically meant for Android applications. It uses three components to verify fingerprints: CPU model, CPU serial number, and internal storage serial number.
- PMType3 scheme is available only for SL-UserMode locking type.
- If you select PMType3, clone protection for virtual machines will be disabled and the value of Rehost drop-down will be Leave as it is by default.
- PMType4: This scheme is specifically meant for Android applications. It uses five components to verify fingerprints: CPU model, CPU serial number, internal storage serial number, Android serial number, and Android Firstboot.
- PMType4 allows users to reinstall licenses on Android without the need for reactivation, provided that features are licensed using Perpetual or Expiration Date license type only.
- This scheme is available only for the SL-UserMode locking type.
- If you select PMType4, clone protection for virtual machines will be disabled and the value of Rehost drop-down will be Leave as it is by default.
- For all new users of Sentinel EMS, PMType4 clone protection scheme will be available by default.
- FQDN: This scheme uses only the machine’s FQDN (Fully Qualified Domain Name) to verify fingerprints.
- Disable: Protection against the cloning of physical machines will be disabled.
Virtual Machine
Following clone protection schemes are available to protect against the cloning of virtual machines:
- VMType1: This scheme uses three components to verify fingerprints: Virtual MAC address, CPU characteristics, and UUID.
- VMType2: This scheme accesses the VM Generation ID (if available) to avoid a snapshot restore attack by preventing the VM from returning to an earlier point in time.
Additionally, it provides the protection given by the VMType1 clone protection scheme.
This scheme is currently available only in case of AdminMode for the Sentinel SL locking type.
The scheme is supported on Windows 8, Windows 10, and Windows Server 2012 R2 with the supported versions of the following virtual machines:
- VMware Player, Workstation, and ESXi.
- Hyper-V Server
Additionally, the scheme is supported on some earlier versions of Windows with Hyper-V Server if Hyper-V integration services from Windows 8 or Windows Server 2012 is installed.
- VMType3: This scheme is designed to provide clone protection for the Microsoft Azure virtualization platform. It ensures that a protected application in a server virtualized environment cannot be used if the license is copied from one virtual machine to another.
Currently, this scheme is supported on Windows (SL-AdminMode and SL-UserMode) and Linux (SL-AdminMode) operating systems.
- FQDN: This scheme uses the machine’s FQDN to verify fingerprints. This scheme provides increased reliability and provides flexibility of operation in a server virtualization environment.
- Disable: Protection against the cloning of physical machines will be disabled.
- See Protection Against Cloning for more information about clone protection.
- For a more detailed description of each of the clone protection schemes see How Sentinel LDK Detects Machine Cloning.
-
If Sentinel HL locking type is selected, the following check boxes appear:
- Upgrade to Driverless: See Upgrading Sentinel HL keys to Driverless Configuration for details.
- Use Virtual Clock: If you select this option, you will be able to manage time-based licenses for Sentinel HL (Driverless Configuration) keys where no real-time clock is available. A virtual clock will be maintained in such keys.For Products that are licensed with Sentinel SL keys, Sentinel HL Time keys, and Sentinel HL NetTime keys, V-Clock is always available. For details, see Enabling V-Clock for Sentinel HL (Driverless Configuration) Keys.
- The Rehost drop-down list appears if Sentinel SL locking type is selected. Select a value from the following:
- Enable—Enable rehosting for the Product.
- Disable—Disable rehosting for the Product.
- Leave as it is—Retain the value of rehost as is in the Protection key.
- Specify at entitlement time—Enable rehosting to be specified at Entitlement generation.
- Enter Ref ID 1 and Ref ID 2 if required (maximum 250 characters). You can enter information that identifies the Product in a different system, for example, a Product code in your company's ERP system.
- You can specify Features in the Product at this stage or you can choose to do so later. To specify Features in the Product:
- Click Add Features. The Add Features to Product pop-up appears.
- Select the Features to add. Click Add Features to Product. The associated Features are displayed in the main screen.
- To remove a Feature from the Product, click Remove in the same row. To remove multiple Features, select the check boxes and click Remove.
- In the Excludable? column specify a value from the following. If you want to specify the same option for all Features, click All (to specify Can be excluded for all Features) or None (to specify Always include for all Features).
- Select Can be excluded if you want to enable the order taker to exclude the Feature while generating Entitlements.
- Select Always include if you want that the Feature should never be excluded.
- To specify the license terms for an individual Feature, click the Configure link corresponding to the Feature.
For multiple Features that require the same licensing details, you can specify the licensing terms at one time. Select check boxes for multiple Features, and click the Configure button at the top right corner of the pane. For detailed information on specifying license terms, see Defining License Terms for an LDK Product.
- To define memory areas and write data for secure storage, select the Memory tab. See Defining Memory Data for detailed instructions.
- When you have finished defining the Product details, click:
The new Product is displayed in the Products page.
When you associate a feature with a product, the Locking Type drop-down list is disabled. Therefore, to change the locking type, you must first remove all the associated features. After changing the locking type, you need to restore all the features that were associated with the product.